Source Material: March 02, 2023
Welcome back bonsai enthusiasts, today I share a short article focused on a recent repot which illustrates some larger questions we must ask for our trees to look their best. Where should I position my tree in the pot? To the center? To the left? To the right? How do I want the nebari/root flare to look given the options the tree provides? Read on for a closer look at the unique challenges and character of this tree, think through what you would have done if it was your tree, and feel free to share those ideas in the comments below.
Sections:
- Reviewing Repotting Basics
- History of the Tree
- Nebari Decisions
- Planting Position - What Fits Best?
- Final Result
- Announcements
I. Reviewing Repotting Basics
IA. Previous Posts on Repotting
I have previously made several posts on the topic of repotting bonsai which I will refer you to for more information. These posts are all listed in my "
Bonsaiclopedia" page so you can easily refer back to them. First, regarding
when to repot, watch the buds for swelling and changes in color and keep your eye on the weather too. Second, when repotting or root pruning a tree, be mindful of the "
water and sugar equations" which outline what needs must be met at all times for our trees to continue surviving. These two factors must always be supplied to the plant and in balance. Thus we cannot prune off too many roots at once as this impacts the ability for water intake, but if we dig a tree in the summer (when water use is at its peak), then you should also defoliate or prune the top of the tree to reduce water loss, otherwise, you will see dieback or the tree may not survive at all. Likewise, the tree always must be healthy enough and have enough stored sugars to recover from any root pruning or top-pruning operation, otherwise, the tree will not put out new growth and can die. Consider these factors during your digs and repots.
IB. Intro to Bonsai Soil
The last concept I want to review is soil type. I've also made a post previously about the
repot of my mulberry tree in which I touched on the soil type that I use which I adopted from my own teacher,
Dan Robinson of
Elandan Gardens. Today I want to delve a bit more deeply into this subject as I realized I had not written about bonsai soil previously and the roots of my privet are demonstrative of what I typically get when using my custom soil mix. As experienced bonsai practitioners know, soil is a controversial topic due to the wide diversity of substrates available. The fact is there are multiple soil types that work for different people, in different places, in different climates, with different substrate availability, with different species, different watering regimens, different goals, and sometimes with different outcomes. There's certainly a lot of room for experimentation here if people are up to that challenge (I have some soil-type experiments going on now which I will write more about when they conclude later this year and next year). Anyways I'm not here to say my soil mix is the only option. Instead, I only will say my mix has served me and my teacher well! In that vein, if you want to level up your bonsai and understand soil on a deeper level, I recommend starting by finding an artist - preferably in your local area - whose trees you admire and learning from them what soil type they recommend.
To understand what makes a good bonsai soil mix, we will first describe the basic categories of soil components. I typically use a custom mix of inorganic and organic materials in a defined ratio based on the species of tree. The inorganics promote air space in the pot and allow us to achieve dense fine roots. This is desirable in bonsai culture (more so than other container plants) instead of using regular dirt from the ground or potting soil as more air and more fine roots = less water retention in the pot, thus it's harder to kill trees by overwatering in good bonsai soil. Moreover, the fine roots do all the work of importing new water and nutrients from the soil into the tree, thus more fine roots in a pot = more dense foliage mass which the bonsai can support. Now on the organic side, the purpose of organic material is to retain some water so we don't have to water quite so much in the summer and to provide and retain some nutrients. Organic material also supports the colonization of beneficial bacteria and fungi which aid our trees. Further reading can be done on the CEC (cation exchange capacity) and pH (acidity/basicness) of different substrates for bonsai but that is beyond the scope of an intro article.
IC. An Akadama Substitute?
Now that you know the basic component types that go into custom bonsai soil mixes, we can move on to discuss my specific mix as an example. The basis of the mix I use is the "Boon mix" which may have been in use in Japan long before that name was coined in the US. Volcanic soils such as lava rock (aka scoria), pumice, and akadama (a volcanic clay-like particle that behaves like organic particles in many ways and has been
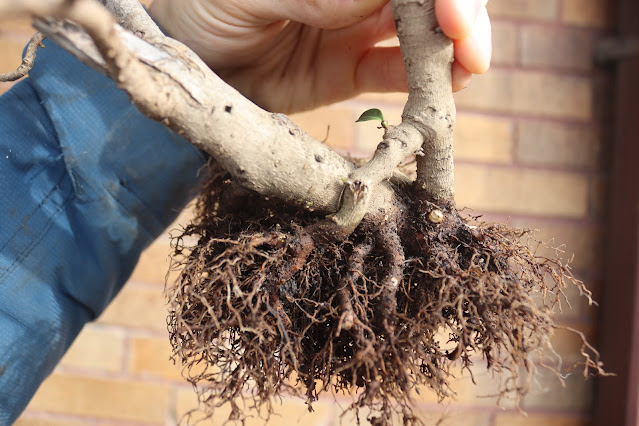
described previously by Jonas Dupuich here) are the main soil types used by bonsai professionals in Japan and here in the US. Unfortunately, these soils are limited in their geographic availability which makes them expensive but they remain widely used due to their proven effectiveness! The akadama in particular is currently only mined and exported from Japan itself, although a similar soil type has been found in the Cascade Mountains and may one day be available. Anyways, I have maintained the use of the lava and pumice as they are reliable inorganic components despite their cost in Ohio. However, partially to save money and partially due to witnessing the success of an alternative material, I generally do not use akadama. Instead, I used aged fir or pine bark chips which act as the organic material for water retention without clogging the air spaces in the pot. I use a 1:1:1 ratio of these materials for my conifers and plants that like to be a little on the dry side like succulents. Meanwhile, a ratio of 2 parts bark chips, 1 part lava, and 1 part pumice is what I use for the plants which prefer more water retention like most deciduous species and some younger seedlings. Below you see the quantity and density of fine roots produced by my shohin privet after 3 years of living in this mix. You be the judge as to whether bark chips as an akadama substitute are worth trying!
 |
| Dense fine roots filled the pot after 3 years growing in 2 parts aged bark chips, 1 part lava, and 1 part pumice. Together these components provide air spaces for fine root development, retention of nutrients, and promote a healthy soil microbiome. |
II. History of the Tree
I dug this shohin privet in 2020 in Bellevue, WA from the garden of someone who had actively pruned it back such that it was just two small, unwanted, fused stumps in the ground when I stumbled on them. Later, I may dig up those early pictures to show the progression but the name of the game for this post is focus! Anyways, after the tree recovered from the dig, I trained it over the last 3 years with annual pruning and wiring adjustments to the crown. For that time, it lived in the same pot and, as it is now looking like a respectable bonsai, I wanted to finally get it into a bonsai pot to slow down its vigorous growth. Below you can see the starting point for the tree in its training pot at the time of our repot.
 |
| Potential front. Pre-repot, March 2023. |
 |
| Another potential front? TBD. Pre-repot, March 2023. |
III. Nebari Decisions
Here you can see the nebari at the front. There is one particularly long surface root that rises above the plane of the rest of the nebari and then descends back into the soil. Also, it's hard to see here, but there was even more attractive nebari below the soil which we exposed a bit more of today and we will continue exposing that over time as it develops. Behind the long, rightward root is also surface roots from the lower trunk which we can show off if the offending root was repositioned or lowered. So here are the options...
- Do nothing, leave the long, rightward root. It's not necessarily too high or too large as to be unnatural looking.
- Press the rightward root down into the soil with wire staples or a rock to lower it doesn't hide the roots behind it as much. This could also eventually lead to more roots growing off of it which we can choose to shorten the root back to.
- Totally remove the rightward root from the point where it ascends into the air. Develop the other roots behind and below it more to show off in the future.
Which tact would you take here? Pick an option before proceeding below to see what I chose.
 |
| The front of the tree's root spread/nebari with the problematic rising and descending root visible at the center right. |
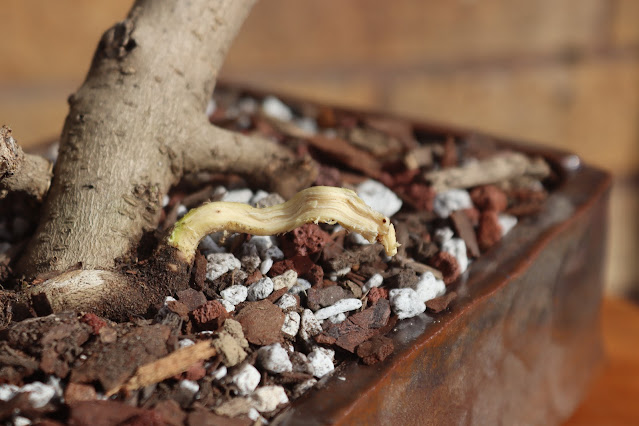
Below you can see I actually did a fourth option for now. I was leaning towards killing the root but it does have some interesting natural movement so I was considering option 1 and 2 to keep making use of it. In the end I tried a compromise between all three options. I killed the root so that the tree's resources will go towards developing the lower nebari which will be more attractive in the long run. I also decided to kill the root while leaving it as a dead stub (jin in Japanese), and I carved the stub for now by removing the outer bark and peeling layers of the freshly killed wood back. I don't expect this stub to last forever as it will eventually decay, but while the lower nebari is improving, this can be another source of visual interest down low on the tree.
 |
| I decided to kill the root and peel back the fresh deadwood to make some visual interest out of it. |
IV. Planting Position - What Fits Best?
Here I want you to compare the below 3 options on planting positions for this tree. Come up with an answer for which option (position in the pot) you would use for this tree? I won't share my opinions until after you review the images so as to not bias you.
 |
| Option 1. A little off to the left. The lower tree's crown meets the edge of the pot. Here neither tree is centered. |
 |
| Option 2. More to the center. The lower tree's crown goes beyond the pot and there looks like there is now more negative space between the pot and the crown of the upper tree. Here the lower tree is centered but the upper trunk is not far off. |
 |
| Option 3. More to the right. The negative space between the pot and the upper tree is emphasized and the lower tree extends far beyond the rim of the pot. Here the upper tree is centered. |
After reviewing these options, I liked both options 1 and 2, but I decided to go with something more like option 1 as I enjoyed how the negative space emphasizes the directionality of the tree. The tree is pointing to the right as the lower trunk reaches in that direction. Thus, the negative space on the left side of the upper trunk should be minimized so the eye does not focus on it and instead the eye follows the directionality to where I am intending. Also, the extra space below the righthand trunk in option 1 could be used to add a penjing figurine in the future, but the space in option 2 is more limited and thus too cramped for that option. Option 2 is also compelling in its own right as it is a bit more balanced, and it could be worth returning too in the future. Lastly, option 3 I did not choose due to the negative space between the pot and the upper trunk being totally in conflict with the direction of the tree. If you had a different pick or a different explanation for why, please let me know.
V. Final Result
I hope you enjoyed practicing your bonsai problem-solving skills in today's choose your own adventure article. I haven't written many blog articles recently but now that I've passed my candidacy exam in grad school, you can expect to hear about my tree work more often as I have more free time again. Thanks again to Mark Passerrello of Ancient Art Bonsai here in Columbus, OH for the affordable pot! You can see our interview with Mark on the Bonsai Time Podcast here.
 |
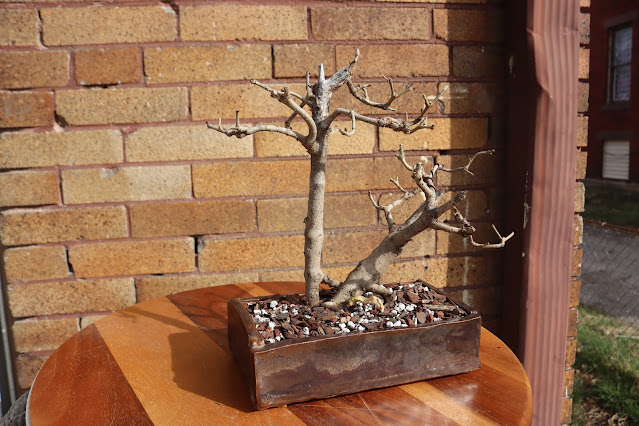
| Potential front. Post-repot, March 2023. |
 |
| Potential back. Post-repot, March 2023. |
VI. Announcements
- Spring is sprung here in Ohio! The best time to start a bonsai from seed was yesterday, but today is the next best time. Get your seeds for over 30 species of trees both native and traditional Japanese species for bonsai from my Etsy page to start your bonsai from seed. As always, I send my custom bonsai-from-seed guide for every purchase of seeds which goes over the steps you need to take for germination and long-term bonsai success. You can also view my lecture on seed growing bonsai for free here.
- More Bonsai Time Podcast Episodes coming later this week! See our past episodes at www.bonsaitimepodcast.com
- Upcoming Central OH Bonsai events:
- CBS March Meeting - 3/19/23, 2pm-5pm @ Franklin Park Conservatory - repotting BYOT, a short presentation by Kevin Faris on his work with Todd Schafer, and Ken Huth of Ken's World of Bonsai will be attending and selling seedlings of many species.
- OSU Bonsai Club March Meeting - 3/22/23, 5pm-7pm @ the OSU Ag Admin Building - Wiring Bonsai 101 with instruction by myself and Kevin Faris.
- CBS + Columbus Parks and Recreation Department Invasive Honeysuckle Dig on 4/15/23, 9am-12pm. The location will be announced soon. See the potential for using invasive honeysuckle for bonsai here


I enjoyed the article and your approach. Always learning, thanks.
ReplyDeleteDeb in Pacific Northwest.
Thanks Deb, I'm glad you found it useful!
Delete